Difference between revisions of "New Player Walkthrough"
| Line 187: | Line 187: | ||
---- | ---- | ||
| − | ===Increase Your | + | ===Increase Your Proficiency Caps=== |
...under construction... | ...under construction... | ||
Revision as of 22:07, 17 May 2023
Introduction
Salem is a lovely game “focused on all manner of crafting (farming, building, invention and so forth) and developing [the] required character skills for doing so. It also features free-for-all PvP combat with the possibility to permanently kill player characters.”[1] This can be very intimidating for new players who fear losing all their progress at the hands of veterans. This walkthrough aims to help new players by outlining, step-by-step, how straight-forward it is to get started or back on your feet after a setback.
Progress in Salem is understood by the fact that increasingly stronger characters can make increasingly stronger bases that can in turn make increasingly stronger characters. While it is tempting to put all of one’s eggs in one basket and follow the path and progression of a single “main” character through the game, you will likely enjoy more success playing several characters. If you already have experience managing different Sims in a household then managing different characters in a Salem homestead may feel familiar to you.
One of the interesting features of Salem is that the “world is persistent and mutable, meaning player characters are able to make permanent changes to it by destroying and building landscape and houses etc.”[2] In fact, the current Providence server has persisted online since February 2014 and many veterans have by this point built extensive industrial complexes behind heavy fortifications. The in-game economy is quite stable and it is very easy for new players to procure more advanced foods (e.g., Sweet Jerky, Spore Bajgiel, etc.) to quickly boost the strength of their characters and procure more advanced materials (e.g., Blistersteel Bar) to quickly build more advanced defences, tools, and structures at the start of their journey.
For the sake of presenting the early game mechanics, this walkthrough outlines an independent path to self-sufficiency without any assistance from established players. New players are welcome to skip over these and fast-track their progress by trading with other players.
Creating a New Character
The Tutorial
| Collect:
(
|
| After crafting and equipping the
|
| After learning Colonial Tradesmanship:
|
The Tutorial will teach you how to acquire your first Skills, how to Craft items and how to Build structures. Once the in-game tutorial is completed and your character travels with the Native Guide to select a homestead in Providence, the character is registered in the game and you can log out without losing your progress.
- Collect the listed items. Tip: Open the Abacus Window (Ctrl+A) in a 3rd Party custom client.
- Follow the tutorial instructions, using a
 Stray Chestnut or
  Smooth Stone to learn the skill Survival Skills and then again to learn the skill Lore of The Lumberwoods.
- When prompted to build a
 Drying Frame, a building window pops up requesting 5x
  Branch. Hover over that branch icon in the building window and Shift+Scroll Wheel to quickly fill it with appropriate materials from your inventory.
 - When prompted, glutton one
 Hickory Nut and proceed.
 - When prompted to increase your proficiency cap, craft 1x
 Leafy Leftovers (3 uses), study it once, and then click the
  Flora & Fauna proficiency bar to upgrade its cap from 500 to 700.
 - When prompted, Study
 Leafy Leftovers again to learn the skill Colonial Tradesmanship.
 - Eat a hickory nut to replenish your biles.
- When prompted to build a
Learn  Collector
- Start collecting branches from a tree and continue until you receive 3x
 Broken Bough among them, discarding (Ctrl+Alt+Click) any regular
  Branch to save weight.
 - Study the 3x
 Broken Bough. Study 1x
  Oak Duff. Craft and then study 1x
  Rock Maracas.
 - Learn the skill Collector. This allows you an additional 5kg of carry weight.
Craft 1x  Wooden Shovel
| Collect:
|
A shovel is a handy second tool to have for digging soil and quarrying useful materials like clay and lime. You can craft one in the tutorial area, before heading out to the New World.
Learn  Whittling
- Collect the listed items.
- With your axe still equipped, right-click 1x
 Woodblock in your inventory to split it into 2x
  Wood Choppings. Study both to upgrade your
  Hammer & Nail proficiency from 500 to 700.
 - Craft and study 1x
 Lumberwood Figurine to learn the skill Whittling.
 - Collect 17x
 Woodblock and use 10x to build a
  Whittler's Bench and 7x
  Woodblock to craft a
  Wooden Shovel.
Craft 4x  Clay Pot
| Collect/Craft:
|
|
- With your axe still equipped, chip 10x Stones and craft a
 Fireplace near the clay pit to the north. You can add fuel to it by right-clicking a
  Branch on the stones. Tip: You can do this faster (and indiscriminately) by holding down Ctrl as you right-click the ring of fireplace stones once.
 - Craft a
 Tinder Drill and light the fire. Right-click the Fireplace and use the
  Roasted Nuts recipe to roast
  Any Nuts you collect and get much more energy from them. If you get any precious
  Gelatinous Lard during roasting, save it for later.
 - Build, fill, and light 2 more Fireplaces.
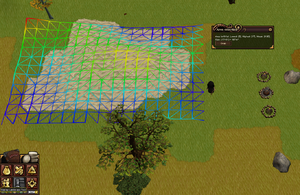
- In the bottom left of the User Interface, next to the chat icon, click the “Display Landscape Tool” and then click the button in the “Select area” window that pops up. Click and drag a rectangle over the clay pit to practice with this tool. Click the “Release” button. This tool will be useful when you are quarrying materials or flatting terrain for construction.
- Equip your
 Wooden Shovel, dig the
  Clay, and craft 12x
  Unburnt Clay Pot. To save weight, discard any branches and craft pots as you collect clay. Close the Landscape Tool.
 - Place 4 of these
 Unburnt Clay Pot in each of the 3 Fireplaces. Make sure all 3 Fireplaces are lit (smoking). This crude firing process takes 20 minutes and can result in either a
  Clay Pot or a
  Pottery Shard. Hopefully at least 4 clay pots survive for your trip to Providence.
Increase Your Biles
The previous task highlighted how tiresome it is to do strenuous activity and how frequently one has to replenish one’s biles by eating food. By raising these 4 humours, the character can carry more, work longer and replenish biles less frequently. To do so, we will practice the gluttony mechanic one more time before leaving for the New World, and only focus on a single Food Group for the sale of simplicity: Nuts and Seeds.
|
| ||
|
| ||
|
| ||
|
|
Reduces Nuts and Seeds by 50% with 50% chance.
Tip: In a 3rd Party custom client, you may wish to enable the follow checkboxes in the options menu:
|
- Begin by collecting and roasting some
 Stray Chestnut,
  Myrtle Oak Acorns,
  Pine Nut, and
  Hickory Nut. If you get any precious
  Gelatinous Lard during roasting, remember to save it for later.
 - Click the forks under the biles to open up Gluttony Mode. Click 1x
 Roasted Chestnut to raise the “red” bile from 5 to 6. Click 1x
  Roasted Myrtle Acorns to raise the “blue” bile from 5 to 6. You may need more than 1x
  Roasted Myrtle Acorns if your Nuts and Seeds efficiency was previously reduced from 100% down to 50%. Repeat this with
  Roasted Pine Nuts to raise the “yellow” bile from 5 to 6. Assuming you previously gobbled a hickory nut during the tutorial; your biles are likely an even 6/6/6/6 now.
 - Immediately after you raised your biles for the third time, the gluttony forks likely reset and the Nuts and Seeds efficiency reset back up to 100%.
- Click the gluttony forks again to repeat this exercise for another 3 increases (always aiming to increase the blue, red, yellow, and black evenly) before the gluttony forks reset so you can repeat the cycle.
- Roasted Nuts are relatively “weak”. Even if you had a lot in your inventory, you will eventually struggle to increase your biles. At higher levels, more roasted nuts will be needed to go up by a single point, and as you gobble more nuts, more will be needed to overcome the resulting drop in efficiency. As you progress in the game, you'll not only be able to prepare foods that are both “stronger” and more efficient but also foods in different food groups that each start at 100% efficiency at the beginning of the gluttony session.
- Move your fork cursor outside your inventory and right-click to exit gluttony mode. Hovering over the
 Full and Fed Up debuff icon in the top left corner of the user interface will tell you how many minutes you need to wait before the gluttony forks reappear for your next session.
For more information, please consult the extensive wiki pages on Humours, Gluttony and Craving.
Increase Your Proficiency Caps
...under construction...
Learn More Skills
Collect or Craft
...under construction...
1x Broken Bough 10x Chestnut 2x Flaming Pinecone 2x Squirrel Stash (from collecting Oak Duff) 1x Oak Duff 2x Leafy Leftovers (2x Maple Leaves, 2x Myrtle Oak Leaves, 2x Oak Duff) 4/6 7x Wood Choppings 1x Simple Crucifix (2x Woodblocks) 1/2 2x Woven Reeds (2x Reeds) 1x Grass Whistle (1x Autumn Grass, 1x Reed) 3/3 4x Rock Maracas (1x Flint and 1x Stone) 6/8 7x Sand 13x Heated Stone (1x Stone) 2x Smooth Stone 3x Spinning Top (2x Woodblock) 5/6
1. Study 1x Broken Bough and 1x Grass Whistle to upgrade your S&S proficiency from 500 to 700. Study 2x Grass Whistles and 1x Chestnut to learn the skill Simple Cooking. 2. Study 1x Rock Maracas and 1x Wood Choppings to learn the skill Foraging. 3. Study 2x Rock Maracas, 1x Sand, and 1x Simple Crucifix to learn the skill Indian Tracking. 4. Study 1x Leafy Leftovers, 1x Sand, and 1x Wood Choppings to learn the skill Exploration.
5. Study 1x Leafy Leftovers and 1x Rock Maracas to upgrade your F&F proficiency from 700 to 900. Study 1x Squirrel Stash to learn the skill Bark Gathering.
6. Study 1x Leafy Leftovers and 1x Chestnut to upgrade your F&F proficiency from 900 to 1100. Study 1x Flaming Pinecone to upgrade your H&S proficiency from 600 to 800. Study 1x Flaming Pinecone and 1x Oak Duff to upgrade your H&S proficiency from 800 to 1000. Study 2x Woven Reeds to upgrade your S&C proficiency from 500 to 700. ***Upgrade FF***Study 1x Squirrel Stash and 1x Chestnut to learn the skill Acute Tree Harvesting.
7. Study 2x Heated Stone to upgrade your M&M proficiency from 500 to 700. Study 2x Heated Stone and 1x Sand to learn the skill Essential Mineralogy. 8. Study 2x Heated Stone and 1x Sand to upgrade your M&M proficiency from 700 to 900. Study 3x Heated Stone and 1x Sand to upgrade your M&M proficiency from 900 to 1100. Study 3x Heated Stone and 2x Sand to upgrade your M&M proficiency from 1100 to 1300. Study 2x Smooth Stone and 1x Rock Maracas to learn the skill Quarrying. 9. Study 1x Spinning Top to upgrade your H&N proficiency from 700 to 900. Study 1x Spinning Top and 1x Wood Choppings to upgrade your H&N proficiency from 900 to 1100 and again to raise it from 1100 to 1300. Study 1x Spinning Top and 3x Wood Choppings to upgrade your H&N proficiency from 1300 to 1500. Study 1x Rock Maracas and 1x Wood Choppings to upgrade your A&C proficiency from 500 to 700. Study 1x Lumberwood Figurine (leftover in inventory from Whittling studies) and 1x Spinning Top to learn the skill Carpentry. 10. Study 1x Spinning Top to learn the skill Patchwork & Rags. 11. Study 1x Chestnut and 1x Wood Choppings to upgrade your H&H proficiency from 500 to 700 and again to learn the skill Bug Hunting. Study 1x Chestnut and 1x Rock Maracas to upgrade your H&H proficiency from 700 to 900. Study 2x Chestnusts to upgrade your H&H proficiency from 900 to 1100. Study 2x Chestnuts and 1x Rock Maracas to upgrade your H&H proficiency from 1100 to 1300.
Prepare for your Departure
Collect/Craft and pack the following items before talking to the Native Guide to end the Tutorial and travel to Providence
 Slingshot
 Jute Cap
 Jute Pants
 Bark Boots or
  Haybales
 Novice Toolbelt
 Clay Pot (at least 4x)
 Birch Bark (28x)
 Lime (2x)
 Granite (6x)
 Hay (2x)
Arriving in Providence
First Homestead
The Native Guide will take you to up to 5 different ![]() Lean-to locations in Providence to make your Homestead. The game allows
Lean-to locations in Providence to make your Homestead. The game allows ![]() Travel between your Homestead
Travel between your Homestead ![]() ... Home and
... Home and ![]() ... to Providence with items in your inventory. Traveling to these destinations from other locations in the wild requires that you first clear your inventory.
... to Providence with items in your inventory. Traveling to these destinations from other locations in the wild requires that you first clear your inventory.
In sequence, you can accept or skip the first 4 options the guide presents and you can only accept the 5th and final option. As you only care about proximity to water, accept the first location with a lake or river nearby.
Boil Tanning Fluid
- Build, fill, and light 4x
 Fireplace
 - Fill 4x
 Clay Pot with water and
  Birch Bark and boil them over the
  Fireplace for 30 minutes
 - Craft 2x
 Woven Basket and fill them with heavy valuables (e.g., extra
  Clay Pot,
  Granite,
  Lime, etc.)
  Lift each
  Woven Basket and right-click your
  Lean-to to store them there
- Move to the centre of your
 Lean-to and
  Travel to Providence.
First  Trade Order
...under construction... collect valuables
Learn  Tanning and
  Prospecting
Craft New Tools
- Buy 2x Nails
- Craft a Sawbuck and Tanning Tub
2x ![]() Leather
Leather
...under construction...
Prepare for your Departure
Collect/Craft and pack the following items before heading back into the wild to scout a new homestead location


