Difference between revisions of "Dig"
(→About) |
Pistolshrimp (talk | contribs) |
||
| (34 intermediate revisions by 7 users not shown) | |||
| Line 1: | Line 1: | ||
| − | {{Action | Required objects= | + | {{Action |
| + | | Required objects= | ||
| + | }} | ||
| + | {| | ||
| + | | | ||
| + | ==Digging== | ||
| + | <onlyinclude>{{#ifeq:{{{transcludesection|digdirt}}}|digdirt| | ||
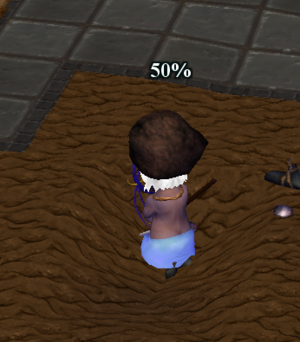
| + | On most biomes, using the {{i|Dig}} action on the ground will drain [[Phlegm]] and lower the elevation on the spot where you are Digging. When Digging on biomes that gives {{i|Dirt}}, you will pick up the Dirt and hold it above your head until you select where to drop it. Holding Dirt counts as {{i|Lift}}ing and therefore will also drain Phlegm and [[Yellow Bile]]. Dropping Dirt on any Dirt producing biomes will increase the elevation on the spot where you dropped the Dirt. Dropping the Dirt in {{i|Bodies of Water}} will cause the Dirt to disappear. Initially, you can only hold 10x clods of Dirt. When you reach capacity, you will not be able to continue Digging. Once you have learned the [[Labouring]] Skill, your capacity increases to 15x Dirt and additionally the Phlegm drain while Digging is reduced. | ||
| + | }}</onlyinclude> | ||
| + | {{:Any Shovel|transcludesection=shovels}} | ||
| + | :{| class=wikitable | ||
| + | ! Biome!! Gives when Dug | ||
| + | |- align=left | ||
| + | | {{i|Beaches}} || {{i|Sand}} | ||
| + | |- align=left | ||
| + | | {{i|Clay Pit}} || {{i|Clay}} | ||
| + | |- align=left | ||
| + | | {{i|Lime Pit}} || {{i|Lime Boulder}} | ||
| + | |- align=left | ||
| + | | {{i|Mountain}} / {{i|Quarry}} || {{i|Boulder}}, {{i|Granite Boulder}}, | ||
| + | |- align=left | ||
| + | | {{i|Snow}} || {{i|Packed Snow}} | ||
| + | |- align=left | ||
| + | | {{i|Swamp}} || Cannot be Dug. | ||
| + | |- align=left | ||
| + | | {{i|Bodies of Water}} || Cannot be Dug. | ||
| + | |- align=left | ||
| + | | All Other Biomes || {{i|Dirt}} | ||
| + | |} | ||
| + | ==Digging Finds== | ||
| − | + | Occasionally, when Digging on biomes that give Dirt, you will uncover other items beneath the Dirt. These items will generally appear on the ground where you were Digging, however, if you are not quick to grab them, they will disappear. | |
| − | + | :{| class=wikitable | |
| − | + | ! Item !! Rarity | |
| − | + | |- align=left | |
| − | + | | {{i|Common Earthworm}} || Uncommon | |
| − | + | |- align=left | |
| − | + | | {{i|Clay}} || Common | |
| − | + | |- align=left | |
| − | + | | {{i|Grub}} || Common | |
| − | + | |- align=left | |
| − | + | | {{i|Flint}} || Uncommon | |
| − | + | |- align=left | |
| − | + | | {{i|Rusty Coin}} || Uncommon | |
| − | + | |- align=left | |
| − | + | | {{i|Frozen Toad}} || Rare | |
| − | + | |- align=left | |
| − | + | | {{i|Traces of the Lost Colony}} || Rare | |
| − | + | |- align=left | |
| − | + | | {{i|Obsidian}} || Very Rare | |
| − | + | |- align=left | |
| − | {{ | + | | {{i|Runestone Shard}} || Very Rare |
| − | + | |} | |
| − | |||
| − | + | ==Terraforming== | |
| − | |||
| − | |||
| − | |||
| − | |||
| − | |||
| − | |||
| − | |||
| − | |||
| − | |||
| − | |||
| − | |||
| − | |||
| − | |||
| − | |||
| − | |||
| − | |||
| − | + | [[File:GetFlatGoddamnit.png|left|120px]] | |
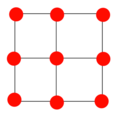
| − | + | The terrain is divided into '''tiles''', but Dirt exists only at the '''corners''' of the tiles (represented by the red dots in the graphic). When you click on the ground with the Dig command, you begin Digging on the '''Northwest Corner'''. You cannot directly Dig a corner unless you can stand in the tile to its south-east. When a corner is Dug, all 4 surrounding tiles turn to bare Dirt. If you Ctrl+Click while using the Dig action, you will stand in the center of the tile and Dig at the 4 surrounding corners until they are all level with each other. Even if only one corner is lowered, all 9 tiles are affected and turn into bare Dirt. You cannot Dig a slope that is too steep to walk on. If Digging would create too steep a slope, you will get a message saying so. | |
| − | |||
| − | |||
| − | + | Right-clicking on the ground deposits all of the dirt you were carrying onto the Northwest Corner of the tile you clicked on. A 3x3 area around the tile you clicked on becomes Dirt. Holding Shift while right-clicking deposits a single unit of Dirt onto the Northwest Corner. Only the 4 tiles adjacent to the affected corner become Dirt. This is a useful command when attempting to carefully sculpt terrain to be a desired shape. Holding Ctrl while right-clicking deposits Dirt into the four corners surrounding the tile, until they are all level with each other. If you are not carrying enough Dirt to bring all the corners up to the height of the highest one, then although this action will use up all of your Dirt, the ground may not be level yet. 9 tiles are converted to Dirt by this action. You cannot raise the ground level so high as to create an un-walkable slope. If depositing Dirt would create a slope too steep, you will get a message saying so. Dirt can placed in [[Pulleys & Levers|Transport Vehicle]]. | |
| − | |||
| − | |||
| − | + | ===Flattening=== | |
| − | |||
| − | |||
| − | |||
| − | |||
| − | |||
| − | + | Using Ctrl for both Digging and Depositing dirt allows you to easily create a large flattened area. Keep in mind that Ctrl-Dig digs down until you are level with the lowest corner, and that Ctrl-Deposit dumps dirt until the corners are level with the highest point. If you level a tile that is adjacent to an already leveled tile, then the new tile will be sharing 2 corners with the old one, making it easy to chain flatness. | |
| − | |||
| − | |||
| − | |||
| − | + | ===Cliffs=== | |
| − | |||
| − | |||
| − | |||
| − | + | Throughout the New World there are areas where the elevation jumps sharply, creating a cliff. It is possible to remove a cliff, although due to the of the Northwest bias when Digging and Depositing, some cliffs are easier to eliminate than others. Digging away at a cliff that faces to the North or the West is easy, since the northwest corner can be accessed with no problem. Digging at a south or east facing cliff is much more challenging, since the tile you need to stand in to dig IS the cliff! For these inconveniently oriented cliffs, you will need to either use Ctrl-Digging which can be slow (working on 4 corners at once when you only actually want to dig one or two of them), or you can try covering the cliff with Dirt from the other side. Fortunately, any cliff which is hard to dig is easy to fill, and vice-versa. The only major challenges are the high spikes and deep pits created in chaotic terrain where the slopes are so steep you cannot even access the tiles needed to Dig down or fill with Dirt. Note: Although changing the corners adjacent to cliff tiles will eliminate the cliff graphic there, these tiles are still cliffs and therefore can only be traversed by Climbing. Invisible cliffs are even MORE annoying than natural ones! | |
| − | |||
| − | |||
| − | |||
| − | + | ==Checking Elevation== | |
| − | |||
| − | |||
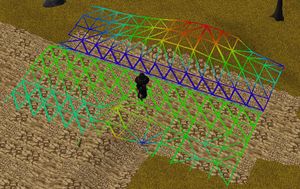
| − | + | [[File:flattening.jpg|right|300px]] | |
| − | | | + | If you have one of the [[3rd Party Clients]], you can check the elevation level by: |
| − | [[ | + | #Press Ctrl+L. |
| + | #Select an area with your mouse. | ||
| + | #Press release so that you can use your mouse again without creating a new grid. | ||
| + | #You will now see a grid with a color-gradient from Red (highest point in selection) to Blue (lowest point in selection). Tiles will have diagonal lines through them indicating how the square is divided into triangles for 3d graphics. On level ground, they all run NE/SW. | ||
|} | |} | ||
| − | |||
| − | |||
| − | |||
| − | |||
| − | |||
| − | |||
| − | |||
| − | |||
| − | |||
| − | |||
| − | |||
| − | |||
| − | |||
| − | |||
| − | |||
| − | |||
{{Gamemenu | {{Gamemenu | ||
| − | | item= | + | | item={{PAGENAME}} | key=I |
| − | | key=I | + | | parent1=Adventure | key1=V |
| − | | parent1=Adventure | ||
| − | | key1=V | ||
| − | |||
| − | |||
| − | |||
| − | |||
| − | |||
| − | |||
| − | |||
| − | |||
}} | }} | ||
Latest revision as of 23:40, 5 October 2022
| |||||||
DiggingOn most biomes, using the ShovelsEquipping
Digging FindsOccasionally, when Digging on biomes that give Dirt, you will uncover other items beneath the Dirt. These items will generally appear on the ground where you were Digging, however, if you are not quick to grab them, they will disappear.
TerraformingThe terrain is divided into tiles, but Dirt exists only at the corners of the tiles (represented by the red dots in the graphic). When you click on the ground with the Dig command, you begin Digging on the Northwest Corner. You cannot directly Dig a corner unless you can stand in the tile to its south-east. When a corner is Dug, all 4 surrounding tiles turn to bare Dirt. If you Ctrl+Click while using the Dig action, you will stand in the center of the tile and Dig at the 4 surrounding corners until they are all level with each other. Even if only one corner is lowered, all 9 tiles are affected and turn into bare Dirt. You cannot Dig a slope that is too steep to walk on. If Digging would create too steep a slope, you will get a message saying so. Right-clicking on the ground deposits all of the dirt you were carrying onto the Northwest Corner of the tile you clicked on. A 3x3 area around the tile you clicked on becomes Dirt. Holding Shift while right-clicking deposits a single unit of Dirt onto the Northwest Corner. Only the 4 tiles adjacent to the affected corner become Dirt. This is a useful command when attempting to carefully sculpt terrain to be a desired shape. Holding Ctrl while right-clicking deposits Dirt into the four corners surrounding the tile, until they are all level with each other. If you are not carrying enough Dirt to bring all the corners up to the height of the highest one, then although this action will use up all of your Dirt, the ground may not be level yet. 9 tiles are converted to Dirt by this action. You cannot raise the ground level so high as to create an un-walkable slope. If depositing Dirt would create a slope too steep, you will get a message saying so. Dirt can placed in Transport Vehicle. FlatteningUsing Ctrl for both Digging and Depositing dirt allows you to easily create a large flattened area. Keep in mind that Ctrl-Dig digs down until you are level with the lowest corner, and that Ctrl-Deposit dumps dirt until the corners are level with the highest point. If you level a tile that is adjacent to an already leveled tile, then the new tile will be sharing 2 corners with the old one, making it easy to chain flatness. CliffsThroughout the New World there are areas where the elevation jumps sharply, creating a cliff. It is possible to remove a cliff, although due to the of the Northwest bias when Digging and Depositing, some cliffs are easier to eliminate than others. Digging away at a cliff that faces to the North or the West is easy, since the northwest corner can be accessed with no problem. Digging at a south or east facing cliff is much more challenging, since the tile you need to stand in to dig IS the cliff! For these inconveniently oriented cliffs, you will need to either use Ctrl-Digging which can be slow (working on 4 corners at once when you only actually want to dig one or two of them), or you can try covering the cliff with Dirt from the other side. Fortunately, any cliff which is hard to dig is easy to fill, and vice-versa. The only major challenges are the high spikes and deep pits created in chaotic terrain where the slopes are so steep you cannot even access the tiles needed to Dig down or fill with Dirt. Note: Although changing the corners adjacent to cliff tiles will eliminate the cliff graphic there, these tiles are still cliffs and therefore can only be traversed by Climbing. Invisible cliffs are even MORE annoying than natural ones! Checking ElevationIf you have one of the 3rd Party Clients, you can check the elevation level by:
|
|


